
Setting up a mail server with OpenSMTPD, Dovecot and Rspamd

Table of Contents
TL;DR:- NO TL;DR: this time, I spent hours writing, you should spend minutes reading. - OK... I explain in WAY TOO MUCH details how to setup a mail server
EDIT (2019-10-26) #
OpenSMTPD 6.6.0 was released today, the article was updated to reflect that it applies to the current release and no longer a development version.
EDIT (2019-12-15) #
I have refactored the article to remove the political aspect behind self-hosting, which is now a standalone article, as well as a blurb on reputation since this will become part of a serie of articles.
Wow, that was unexpected #
In a previous article, I explained why I think the “mail is hard” myth is unfounded and why I think people shouldn’t be discouraged from running their own mail services. I didn’t know this article would gather so much attention, reaching over 75k reads in three days (currently past 85k) when my next most read article reached 15k reads… in over a year.
I wish I had a soundcloud. I have a patreon though. I also wish I had entered more into details and not covered things so superficially.
This article is DENSE but this is because I will hold hands at an absurd level, removing all my blabber will only leave very few technical parts.
This is for techies and sysadmins #
Self-hosting mail requires a minimum of knowledge and dedication, it is not a two-clicks thing, you need to have some basic knowledge and you have to be willing to pour some time into it. If you’ve never touched a DNS zone or if you think that taking an hour to setup something is hard, then this will not be easy and I don’t recommend you do it unless you WANT to learn a ton of stuff.
If you’re a sysadmin who is familiar with sysadmin work, then most of the sysadmin work you already do is considerably harder than setting up a mail instrastructure. I’ll reiterate it for you: mail is not hard.
EHLO hypno.cat #
For this article, we will setup a mail server for hypno.cat, a small website for my thriving (hypothetical) hypnotherapist activity. I registered the website years ago because I liked the name, but never done anything with it beyond hosting an awesome animated file.

Google, Bing and Yahoo have somehow known about it for years and indexed that front page, so they won’t consider it as a domain that was just bought by a spammer to start sending mail, however it is virtually unknown to anyone on the internet because it has no content, doesn’t link to anywhere, isn’t linked from anywhere, and has never sent or received mails from or to anyone. It is an important detail because it shows how the age of a domain has a huge impact on your reputation.
I’m going to set it up for real as I write the article, from the moment I have booted a brand new VPS to the moment I have received mail back and forth to my Gmail account. I have chosen that one because it is over-represented in the population and this explains why people complained the most about delivery issues there. I personally think that Outlook is worse in terms of interoperability, but lets keep that for a future article maybe.
The mail services for hypno.cat are going to provide TLS-secured incoming and outgoing e-mail. They are also going to allow me to submit messages from my smartphone’s IMAP client, the Gmail application, so my users don’t feel much of a change in habits. I could just as easily provide a webmail, with Rainloop or Roundcube, or setup Thunderbird or mutt. Any IMAP client will work just fine so I will not cover this part, there are many alternatives and plenty of tutorials on how to set them up already. There’s even techniques to help mail clients auto-discover their configuration, you can figure that out by yourselves.
My outgoing mail will pass the basic checks at Gmail, namely SPF, DKIM and DMARC, which are more than enough to get your mail through. We could do a lot more, but the goal here is to find the proper balance between doing enough work to look good and remaining simple.
Incoming mail will be filtered to reduce the volume of spam, either by killing obvious bad senders at session time when they are detected, or by providing classification so Spam is in a dedicated folder to avoid cluttering the Inbox. I could stop here, since that would already be a fairly nice setup, but I’ll also throw in a bit of configuration to teach Dovecot how to train spam detection through moving mail from the Inbox to Spam and the other way around. That part is slighly more complex because it relies on Sieve which is not the best piece of engineering, feel free to discard if you don’t care, I did without it for over ten years. It’s a nice-to-have, not a must-have.
Requirements #
The very first requirement is to figure out where you are going to run your mail server.
With widepsread permanent connections through DSL or FTTH, a home connection may be tempting but it is not a good idea as the IP address spaces of ISP are often blacklisted or suffer from a bad reputation to start with. In addition, many ISP prevent outgoing SMTP traffic to avoid compromised desktops from becoming spamming bots. I find the best option to be renting a dedicated server or a VPS from a hosting company after making sure that SMTP traffic is allowed there.
I have rented my dedicated servers at online.net for the last twelve years and am very happy with them. You’ll even find on this blog instructions to run OpenBSD on their servers as they don’t support it natively. They do not filter SMTP, which is good because you can run an SMTP service right away, however the IP addresses may have been previously used by bad senders and you will want to test them. If the IP that is automatically allocated to you isn’t good, you can still order an additional one and pick it in a different range after checking that it isn’t in a blacklist, or that it doesn’t have a bad reputation already.
Alternatively, for the purpose of creating my own commercial mail services, I started building an infrastructure on vultr.com (that’s a referal link). I haven’t been there for long so I might still change my mind, but so far I’m very happy with it. They filter SMTP by default so you have to open a ticket to explain what you intend to do with mail. When I explained that I didn’t intend to become an ESP but rather provide hosting services, they were helpful and unfiltered the same day.
It does not matter much where you decide to run your mail server, but what you need to check is that:
- the host doesn’t have a history of hosting spammers and allows you to do SMTP
- you have an IP address that is dedicated to your mail
- you have control of the reverse DNS for that IP address
- your IP address isn’t already in blacklists
As long as these requirements are met, you should be fine.
It is a good plan to prepare for incidents and this is done by using a backup mail server to take over when the primary one is down. I won’t cover this as it’s not complex, just a matter of an additional DNS record and an additional mail server routing traffic to the primary one, you’ll figure this out by yourselves. HOWEVER, a lot of people mentioned that you can get blacklisted and lose mail, so I think now is the right time to recommend that you don’t host your different mail servers at the same place. You don’t want the two of them to go down if there’s a power or network shortage in your datacenter, and you also want to ensure that if your IP range gets blacklisted as collateral damage from an evil neighbor, the IP of your backup mail server is “far enough” to not be blacklisted too. This way, should your primary mail server be temporarily blocked from sending, it can reroute traffic through the backup mail server until the issue is solved.
I have endured collateral damage on my own setup only once during the last ten years. It was annoying for sure because incidents are never fun, but I rerouted traffic to my secondary server to unbreak traffic, filled the form to delist my IP while providing proof that I was a legitimate sender, rerouted traffic back when issue was resolved. It was nowhere near the big deal people make out of it.
No stress for people who plan ahead.
The technical stack #
I will spin a new VPS at vultr.com (that’s still a referal link), install the latest OpenBSD snapshot because that’s how I roll (this will not be covered in this article), and build my mail system on top of it. I will assume OpenBSD throughout the rest of my writing but besides system-specific commands to install packages the configuration should be similar from a system to another. If you’re tall enough to run a mail server, you should be tall enough to adapt pathnames accordingly or … just use OpenBSD already !

For the SMTP layer, which is in charge of exchanging messages between hosts disregarding what users will use to access their mail, I will be using the OpenSMTPD software. It is the default SMTP daemon for the OpenBSD operating system and has a portable version which is available on Github with instructions on how to build. These instructions are for the 6.6.0 version or later, they will not work on earlier versions.
For the IMAP layer,
which will allow users to retrieve messages they received and access them from their smartphones or webmails,
I will use the latest version of Dovecot.
I will also use the Dovecot-Pigeonhole package,
which will allow us to train the antispam solution into learning Ham from Spam.
If you intend to only use a console client over ssh,
such as mutt for example,
you can skip that part as OpenSMTPD can deliver in a local mailbox that mails clients can access directly.
In this article,
we setup IMAP because we acually want to read mails from a smartphone as that’s what the regular people do.
Finally, for the spam filtering layer, I will use the excellent Rspamd daemon which is far more than just an antispam solution. It provides state of the art spam filtering methods, but also provides antivirus integration, dkim signing, and a ton of modules which you can chose to use or not to fine tune your setup. In this article, we’ll simply use it for its DKIM-signing and spam filtering features which is the bare minimum we need.
Making myself reachable #
SMTP is very tighly coupled with DNS and other hosts rely on DNS lookups to find out which machine handle mail for your domain.
This is done through the lookup of MX (Mail eXchanger) records,
so the most minimal thing to do for SMTP to work is to declare an MX record for your domain.
For hypno.cat,
the zone contains the following:
;; an A (and AAAA record for IPv6) record is declared to name your mail server

mail.hypno.cat  A       217.69.8.253
mail.hypno.cat  AAAA    2001:19f0:6801:867:5400:01ff:fee7:7af7


;; an MX record is declared to let the world know that mail.hypno.cat handles mail for hypno.cat
;; 0 is the highest preference, if we had a backup MX we'd set a higher number on it,
;; let's keep that for later, shall we ?

hypno.cat.      MX 0    mail.hypno.cat.
;;hypno.cat.    MX 10   mail-backup.hypno.cat.
I can verify that everything is fine using the host and dig utilities to check that the mail server name resolves and that the MX lookup returns the mail server name:
$ host mail.hypno.cat
mail.hypno.cat has address 217.69.8.253
mail.hypno.cat has IPv6 address 2001:19f0:6801:867:5400:1ff:fee7:7af7

$ dig -t MX hypno.cat +short
0 mail.hypno.cat.
At this point and with these DNS records,
other mail servers can already lookup which MX is responsible for hypno.cat,
and contact it when they want to send mail to any address for that domain.
Making myself look all fine and dandy #
That’s not enough because nowadays you MUST have a reverse DNS (rDNS) AND Forward-Confirmed rDNS (FCrDNS).
There’s a reason for that.
A large number of the hosts spamming the world are compromised machines,
with a large share of them being home computers behind residential connections.
Many of these residential connections don’t have rDNS,
don’t have FCrDNS,
or have an rDNS that matches a dynamically allocated IP pattern (ie: 123.123.123.123.dyn.adsl.example.com).
Because they are individually compromised machines,
and not regular servers under the spammers control,
rDNS and FCrDNS can’t be configured to look nice…
so it became a proof-of-work to configure your rDNS and FCrDNS correctly while ensuring that it doesn’t look like a dynamically allocated IP pattern.
In some of the Big Mailer Corps guidelines this is explicitely stated,
for others you just discover that the hard way.
Either way,
it’s a BARE MINIMUM,
make sure that your hostname looks like a REAL mail server (ie: mail.hypno.cat, not www.hypno.cat).
rDNS is usually out of your control because it’s managed in a somewhat special “arpa” zone owned by the IP address owner. ISP usually don’t let you configure it but server providers can’t realistically expect their customers not to, so they generally provide a small form somewhere in their control panels to let you provide the rDNS you want for the IP address they allocated you:
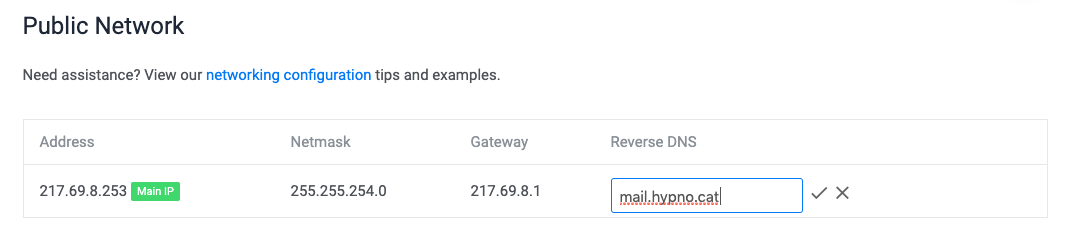
If I setup my rDNS to be the same as the forward records I configured above, then I automatically pass the FCrDNS test. This can be easily verified by looking up the rDNS for an IP address:
$ host 217.69.8.253
253.8.69.217.in-addr.arpa domain name pointer mail.hypno.cat.
$ host 2001:19f0:6801:867:5400:1ff:fee7:7af7
7.f.a.7.7.e.e.f.f.f.1.0.0.0.4.5.7.6.8.0.1.0.8.6.0.f.9.1.1.0.0.2.ip6.arpa domain name pointer mail.hypno.cat.
Then looking up the IP address for that rDNS:
$ host mail.hypno.cat
mail.hypno.cat has address 217.69.8.253
mail.hypno.cat has IPv6 address 2001:19f0:6801:867:5400:1ff:fee7:7af7
If they match both ways, then everything’s fine.
Advertise which machines are allowed to send mail on behalf of my domain #
SPF is a mechanism which makes it possible for destination mail servers to determine if a machine was allowed to send mail on behalf of a domain.
How it works is very simple, basically you add a DNS record to the zone for your domain stating which servers will emit mails. When a destination mail server receives mail with a sender from your domain, it checks if the IP address of the server submitting the e-mail is part of the whitelist.
SPF is not mandatory but it is one of the things that makes you look good. While it is only informative by default, not necessarily resulting in mails being junked if they fail the test, it does have an impact on computing the likeliness of a message being a spam when added to other factors. It is commonly accepted that lack of SPF has a very negative impact on the reputation of a domain, so given how simple it is to provide the record, there’s simply no excuse.
There are multiple ways to setup SPF, in this example I will simply set it up so ONLY my mail server can send mail on my behalf:
hypno.cat. IN TXT "v=spf1 mx -all"
Should hosts receive a mail with a sender @hypno.cat not originating from mail.hypno.cat,
they will be able to assume,
or even enforce,
that it should be rejected.
Prove that I actually authorized the message #
DKIM is an authentication mechanism by which you can cryptographically sign mails emitted by your mail server, proving that you saw them and took responsibility in letting them transit. Hosts receiving these mails can verify that you authorized them, by verifying the signature and detect possible forgery.
Like SPF, this is informative by default and failing a DKIM signature or even lacking the mechanism doesn’t mean a mail can’t inbox, however it accounts in the bad points given to a sender and degrades the reputation. It is also commonly accepted that lack of DKIM has a very negative impact on the reputation of a domain, so again, just do it.
It is slightly more complex than SPF because, although it also relies on DNS, for DKIM you have to generate a keypair in order to publish the public key in a DNS record.
We’re in 2019, I will be generating a 1024 bits RSA key, I know.
— BEGIN DIGRESSION —
2048 bits RSA public keys do not fit in a DNS TXT record and must be truncated into two records, but not everyone is able to cope with these truncated keys so you may lose DKIM benefits by going 2048 if hosts fail to use your (partial) public key and assume you’ve failed signing. Given that we’re not looking into security more than trying to look good at this point, we’ll just look the other way while excusing the fact that there’s a very moderate risk of impersonation when used in conjunction with SPF. This is very bad thinking but DKIM also has other short-comings and given that virtually everyone does 1024 bits RSA, I suggest we argue about the 1024 vs >= 2048 key size when we’re already successful at exchanging mails with Big Mailer Corps, but I’ll just take a moment to stress out, without pointing fingers at any, that even some security companies that actually work in the mail industry have issues with 2048 bits RSA.
Companies that actually provide sender reputation scoring. Oh, the, irony.
— END DIGRESSION —
If this genuinely worries you, you can still experiment truncating key into two records and see if it suits you, adapting my example is trivial, just make sure you have a TXT record with a part of the key and another TXT record with the remaining.
I’ll create a directory to hold the keys:
# mkdir /etc/mail/dkim
Then, the following commands will generate the keypair and extract the public key out of the private key:
# openssl genrsa -out /etc/mail/dkim/hypno.cat.key 1024
Generating RSA private key, 1024 bit long modulus
..............................++++++
...............++++++
e is 65537 (0x10001)

# openssl rsa -in /etc/mail/dkim/hypno.cat.key -pubout -out /etc/mail/dkim/hypno.cat.pub
writing RSA key

# cat /etc/mail/dkim/hypno.cat.pub
-----BEGIN PUBLIC KEY-----
MIGfMA0GCSqGSIb3DQEBAQUAA4GNADCBiQKBgQDThHqiM610nwN1nmV8OMc7PaPO
uJWVGRDz5bWj4cRjTTmQYjJQd02xrydRNrRhjEKBm2mMDArNWjoM3jvN04ZifqJx
DmKr7X8jsYi+MPEHz6wZxB8mayDK6glYTCyx//zl1luUdvm26PutA38K8cgnb7iT
kfVP2OqK6sHAdXjnowIDAQAB
-----END PUBLIC KEY-----
Finally, I can create the DNS TXT record by extracting the public key out of the armor delimiters and formatting the content so it displays as follows:
20190913._domainkey.hypno.cat. IN TXT "v=DKIM1;k=rsa;p=MIGfMA0GCSqGSIb3DQEBAQUAA4GNADCBiQKBgQDThHqiM610nwN1nmV8OMc7PaPOuJWVGRDz5bWj4cRjTTmQYjJQd02xrydRNrRhjEKBm2mMDArNWjoM3jvN04ZifqJxDmKr7X8jsYi+MPEHz6wZxB8mayDK6glYTCyx//zl1luUdvm26PutA38K8cgnb7iTkfVP2OqK6sHAdXjnowIDAQAB;"
The name of the record should be constructed using this pattern: <selector>._domainkey.<domain>.,
where <selector> is a name you chose and which allows multiple keys to coexist.
I like to use the date at which I generated the keypair,
but whatever you chose,
write it down for later as we’ll need it when configuring DKIM signing.
Also,
note that the public key doesn’t have to be kept in the directory once it’s published in DNS.
It can always be retrieved from the private key should it be needed for some reason,
however I like keeping it around for fast reference.
And make sure the private key isn’t world-readable if you have local users on your system,
for some reason OpenSSL thinks private keys should be created rw-r--r--.
Instructing hosts what to do with SPF and DKIM failures with DMARC #
SPF and DKIM are both fine, but if they’re informative then it also mean they don’t prevent abuses of your domain name.
DMARC allows instructing a destination mail server what to do with senders that fail SPF and DKIM tests. Most notably it allows instructing them to reject such senders.
There’s no clear indicator that providing a reject policy brings any positive points to a domain over not doing anything, however there are multiple hints that having a DMARC record has a positive impact over having none, even if that record states that nothing should be done about SPF and DKIM failures.
The format of DMARC records goes beyond this article and you’ll find multiple examples in any search engine,
but a very simple record will simply state a policy (p=) of none (reject if you want to be harsh, quarantine if you need more time to decide).
The percentage field (pct=) declares how many of these mails should be subjected to the DMARC policy,
and the Reporting URI of Aggregated field (rua=) is where you should receive DMARC reports should you want to analyze them (before switching from quarantine to reject for example).
I’ll just setup the most dummy record, one that will make all Big Mailer Corps see that we care about DMARC even though we don’t know what to do with it:
_dmarc.hypno.cat. IN TXT "v=DMARC1;p=none;pct=100;rua=mailto:postmaster@hypno.cat;"
Getting yourself a certificate for TLS #
There are multiple ways you can obtain a TLS certificate, and assuming that you are already familiar with hosting other services, I’ll just pretend that you already know how to obtain one from your registrar or from letsencrypt.
If you know how to deal with your certificates, you can just skip this section and go to the next one.
Since I’m really setting up mail.hypno.cat,
I won’t be able to continue this article without obtaining a certificate,
so as a courtesy to OpenBSD users I’ll document how I will generate mine on a brand new OpenBSD install.
acme-client is a utility that lets you request and renew certificates from the console.
It relies on an HTTP challenge,
so it needs to be able to write to a directory that is served over HTTP,
but luckily OpenBSD also ships with an httpd daemon that we can use for the challenge.
Because we’re EXTRA lucky, it also provides an example configuration file that we can use with almost no change.
Simply copy the example configuration from /etc/example/httpd.conf to /etc/httpd.conf,
replace example.com with mail.hypno.cat and remove the tls block since we only care about serving the challenge.
The file should now read as follow:
server "mail.hypno.cat" {
        listen on * port 80
        location "/.well-known/acme-challenge/*" {
                root "/acme"
                request strip 2
        }
        location * {
                block return 302 "https://$HTTP_HOST$REQUEST_URI"
        }
}
The httpd daemon can be started with the following command:
# rcctl -f start httpd
httpd(ok)
The acme-client itself is straighforward to configure,
again simply copy the example configuration from /etc/example/acme-client.conf to /etc/acme-client.conf,
replace example.com with mail.hypno.cat and you should end up with a block like this:
domain mail.hypno.cat {
        domain key "/etc/ssl/private/mail.hypno.cat.key"
        domain full chain certificate "/etc/ssl/mail.hypno.cat.fullchain.pem"
        sign with letsencrypt
}
at this point you can simply run acme-client on the domain:
# acme-client -v mail.hypno.cat
[...]
acme-client: /etc/ssl/mail.hypno.cat.fullchain.pem: created
The certificate and keys are created at the appropriate place, we’ll later adjust paths in OpenSMTPD and Dovecot to point to the proper files.
You can keep the httpd running for future renewals and call acme-client from a cron,
you can shut it down and deal with renewals in another way.
You sort out how you want to renew with the help of the acme-client(1) man page.
Installing and configuring Rspamd #
On OpenBSD, Rspamd is packaged and can be installed with a single command.
We also need to install Redis which is used to store Rspamd statistics and greylisting states (among other things),
as well as filter-rspamd which is the piece of code that allows OpenSMTPD to work with Rspamd.
Both of them are also packaged so they can be installed with a single command too.
As I’m writing this,
filter-rspamd will only be available in the next OpenBSD release due in October,
so if you want to play with it before then,
you can simply obtain it from github and read the README instructing how to build.
Both Redis and Rspamd are already available in OpenBSD packages so the instructions below are already valid for them.
First, I’ll install these packages:
mail$ doas pkg_add redis rspamd opensmtpd-filter-rspamd
[...]
redis-4.0.14: ok
rspamd-1.9.0: ok
opensmtpd-filter-rspamd-0.1.1: ok
The following new rcscripts were installed: /etc/rc.d/redis /etc/rc.d/rspamd
See rcctl(8) for details.
Rspamd is highly configurable so if you want to do funky things, it’s up to you to go read the extensive documentation. For the purpose of this article I’ll keep it very basic, as is the case on my own machines.
I could edit the configuration in /etc/rspamd/actions.conf to adjust junking thresholds to my liking, but the defaults suit me fine so this was just to show them to you:
actions {
    reject = 15;    # Reject when reaching this score
    add_header = 6; # Add header when reaching this score
    greylist = 4;   # Apply greylisting when reaching this score (will emit `soft reject action`)
    [...]
And what I really, really want is for Rspamd to handle my DKIM signing because this is one of the requirements to not look bad to the world.
This is done by providing the configuration to match the DKIM key I generated earlier in /etc/rspamd/local.d/dkim_signing.conf:
# mkdir /etc/rspamd/local.d
# cat << EOF >/etc/rspamd/local.d/dkim_signing.conf
allow_username_mismatch = true;

domain {
    hypno.cat {
        path = "/etc/mail/dkim/hypno.cat.key";
        selector = "20190913";
    }
}
EOF
The allow_username_mismatch configuration is needed here because Rspamd expects usernames to contain the domain name,
but in this setup OpenSMTPD authenticates against simple usernames. Also make sure the dkim key file is
readable by members of the _rspamd group.
We’re done here, Rspamd and Redis can be enabled so OpenBSD starts them at next reboot:
# rcctl enable redis
# rcctl enable rspamd
And I can start them right away so we don’t have to wait until next reboot:
# rcctl start redis
redis(ok)
# rcctl start rspamd
rspamd(ok)
Configuring OpenSMTPD #
OpenSMTPD is installed by default on OpenBSD so there is no installing phase here. If you run a different operating system, either someone has packaged it there and you can install using your package manager, or you can build from source and install by getting code from Github mirror and following build instructions.
As stated earlier, these instructions are only valid for the 6.6.0 release and later, earlier versions don’t support filters and some other features described here.
The default configuration for OpenSMTPD is suitable for local mail server, not accepting connections from the outside, but able to let local users exchange messages between themselves and to a remote host. It looks like this:
#       $OpenBSD: smtpd.conf,v 1.11 2018/06/04 21:10:58 jmc Exp $

# This is the smtpd server system-wide configuration file.
# See smtpd.conf(5) for more information.

table aliases file:/etc/mail/aliases

# To accept external mail, replace with: listen on all
#
listen on lo0

action "local_mail" mbox alias <aliases>
action "outbound" relay

# Uncomment the following to accept external mail for domain "example.org"
#
# match from any for domain "example.org" action "local_mail"
match for local action "local_mail"
match for any action "outbound"
It uses sane defaults as to make it hard to misconfigure,
so if you’re worried about the last line (match for any)
turning your server into an open-relay,
don’t worry too much as it has an implicit (from local).
You would have to very explicitely tell your server to match from any for any in order to let spammers abuse you.
I initially wanted to update the configuration file progressively to hold your hand, but this article grew a lot since my first version. I’ll just put the complete 16 configuration lines configuration file and comment it extensively afterwards:
pki mail.hypno.cat cert "/etc/ssl/mail.hypno.cat.fullchain.pem"
pki mail.hypno.cat key "/etc/ssl/private/mail.hypno.cat.key"

filter check_dyndns phase connect match rdns regex { '.*\.dyn\..*', '.*\.dsl\..*' } \
    disconnect "550 no residential connections"

filter check_rdns phase connect match !rdns \
    disconnect "550 no rDNS is so 80s"

filter check_fcrdns phase connect match !fcrdns \
    disconnect "550 no FCrDNS is so 80s"

filter senderscore \
    proc-exec "filter-senderscore -blockBelow 10 -junkBelow 70 -slowFactor 5000"

filter rspamd proc-exec "filter-rspamd"

table aliases file:/etc/mail/aliases

listen on all tls pki mail.hypno.cat \
    filter { check_dyndns, check_rdns, check_fcrdns, senderscore, rspamd }

listen on all port submission tls-require pki mail.hypno.cat auth filter rspamd

action "local_mail" maildir junk alias <aliases>
action "outbound" relay helo mail.hypno.cat

match from any for domain "hypno.cat" action "local_mail"
match for local action "local_mail"

match from any auth for any action "outbound"
match for any action "outbound"
That’s all is needed for our complete SMTP setup.
The first two pki lines declare that mail.hypno.cat will use the certificate and key we generated earlier for TLS.
The filter lines apply a set of filters to incoming connections,
check_dyndns will filter if rDNS matches some patterns,
check_rdns will filter if rDNS is missing,
check_fcrdns will filter if FCrDNS is missing,
these are builtin filters in OpenSMTPD that you can tweak to filter at different phases or using other criterias.
senderscore is a custom filter that you can install either through your package manager (pkg_add opensmtpd-filter-senderscore on OpenBSD),
or obtain from Github.
It is not mandatory but I find it particularly useful and will explain why in the next section.
In this configuration,
it will reject a sender if its senderscore is below 10, junk message (add X-Spam header) if score is below 70,
and for my own personal pleasure,
add a delay to each response that is proportional to how bad the reputation is so bad senders are slowed down.
rspamd is also a custom filter that we installed in the previous section.
There’s no configuration as it is fully controlled from the Rspamd daemon responses,
all we need to do is declare it.
If you want to be more conservative and not reject mails to avoid false positives,
you can assign a junk action rather than disconnect action to builtin filters and remove the -blockBelow option in the senderscore filter:
filter check_dyndns phase connect match rdns regex { '.*\.dyn\..*', '.*\.dsl\..*' } junk
filter check_rdns phase connect match !rdns junk
filter check_fcrdns phase connect match !fcrdns junk
filter senderscore proc-exec "filter-senderscore -junkBelow 70 -slowFactor 5000"
This way instead of rejecting sessions, OpenSMTPD will simply junk them so they are in your Spam folder. By monitoring what ends in your junk folder, you can gain confidence and tune settings to match what you really want.
These simple filters,
not even counting rspamd,
are enough to cut most of my Spam turning hundreds of daily spam into a handful.
The rdns regex one can be tuned as depending on your country,
you may see patterns that are particularly repetitive and that would never appear in mine.
To ease maintenance,
you can store them in a file, one by line and use the following construct:
table <dyndns> file:/etc/mail/path-to-my-regex-file
filter check_dyndns phase connect match rdns regex <dyndns> junk
Let’s continue dissecting the configuration.
The table aliases points to a file with… aliases in two columns.
The left column has the user-part of an e-mail address you receive,
the right column has the user to which it should be delivered (ie: root: gilles)
It is recommended that you have aliases mapping root, abuse and postmaster to an account that you actually read.
I didn’t do that because I’m going to trash the install after this article,
but do it.
Then comes the listen lines.
The first one is the public endpoint that other mail servers can contact to send mails to hypno.cat,
it is configured to offer tls using the certificate and key for mail.hypno.cat and filter incoming sessions through all my filters.
The second one is the endpoint for my own users,
on the submission port,
it requires tls using the same certificates,
requires auth using system users (the default, can be configured otherwise),
and filters through the rspamd filter only so we can DKIM-sign our own messages.
The action lines define an action for local mail which is to deliver to a maildir,
while classifying junk in a specific folder and resolving aliases,
the other action is to relay mail and let other host know that we’re mail.hypno.cat when we greet ourselves.
If a server had multiple IP addresses the relay action should also specify the source address to use (with src) to make sure the proper IP address is used,
here I only have one IP address and it is used for mail so I don’t have to.
Finally,
the match lines are the ruleset.
When an envelope enters the SMTP server through one of the listen endpoints,
it is compared to each match line one after another until a matching action in found or the envelope is rejected.
The conditions are fairly explicit so I won’t describe these four lines,
you should be able to figure out by yourself what from any for domain "hypno.cat" means otherwise you shouldn’t be reading this in the first place.
A few words about SenderScore #
SenderScore is an IP reputation database which associates a score ranging between 0 and 100 to an IP address. The score is tied to the volume and behavior observed from these IP addresses, and while we can’t really know HOW these scores are computed because the methodology is not public, a bit of studying allows confirming that they didn’t make these numbers out of nowhere: they do correlate with delivery and error rates at various Big Mailer Corps and it is possible to influence the scoring with changes of behaviors that also correlate to changes in delivery and error rates.
It is also VERY obvious that to build their reputation score they have access to SMTP session informations that only a destination mail server can have, such as the volume of mails observed from an IP address, or the ratio of failed vs accepted recipients, and since the scoring correlates with delivery and error rates in my observations, this implies that they get this information from Big Mailer Corps. Do what you want with that bit of information.
Based on MY understanding, it is a very interesting indicator to limit the amount of spam hitting you. I don’t trust it to be accurate when it comes to good reputations (because I kinda know how to work a bit around) but I do trust it to be HIGHLY accurate when it comes to bad reputations, because it takes a certain amount of doing bad things in high volumes to see a scoring degrade. If you don’t do bulk mailing, you should definitely either be unknown to them or have a scoring around 95 or above, otherwise you’re very likely doing something wrong.
Not everyone is convinced about SenderScore and some delivery experts claim it’s bullshit. I personally ran months-long experiments graphing daily reputation and volumes, then comparing them to delivery graphs, and my opinion is quite the opposite: to me there is a very significant correlation that definitely helps classify senders. I think the best approach is to use the filter for junking, not blocking, and determining by yourself if you’re happy with it.
SenderScore considers that hosts should have a reputation above 70, I would personally assume hosts below 80 to be good junking candidates, and hosts below 10 to be obvious rejects.
Installing and configuring Dovecot #
OpenBSD also has a package for Dovecot which can be installed with a simple command:
mail# pkg_add dovecot
dovecot-2.3.7.2v0: ok
The following new rcscripts were installed: /etc/rc.d/dovecot
See rcctl(8) for details.
New and changed readme(s):
        /usr/local/share/doc/pkg-readmes/dovecot
[...]
And,
specifically for OpenBSD,
following instructions from the readme,
the /etc/login.conf file should contain a dovecot class to bump the resources allowed as Dovecot is very hungry for file descriptors:
dovecot:\
    :openfiles-cur=1024:\
    :openfiles-max=2048:\
    :tc=daemon:
Once that is done, there’s really not much to do on the Dovecot side except have it point to the proper TLS certificate we generated earlier.
I do that by tweaking the ssl_cert and ssl_key configuration keys in the /etc/dovecot/conf.d/10-ssl.conf file so they read as follows:
ssl_cert = </etc/ssl/mail.hypno.cat.fullchain.pem
ssl_key = </etc/ssl/private/mail.hypno.cat.key
Then Dovecot must be told that mails should be looked up in the user ~/Maildir directory as this is where OpenSMTPD drops files.
I do that by tweaking the mail_location configuration key in the /etc/dovecot/conf.d/10-mail.conf file so it reads as follows:
mail_location = maildir:~/Maildir
We’re all set, we can enable the daemon so it’s started at next boot, and start it right away:
mail# rcctl enable dovecot
mail# rcctl start dovecot
dovecot(ok)
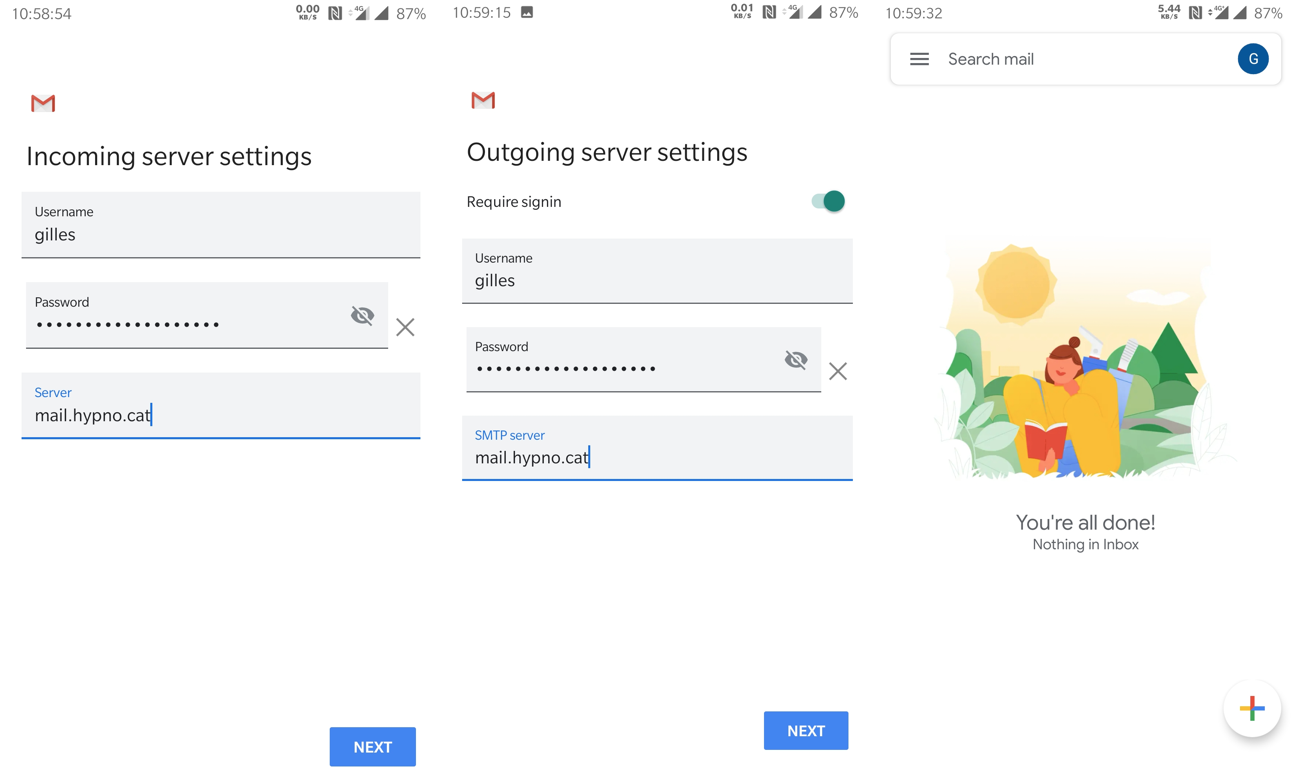
At this point,
you can already configure any mail client like mutt, thunderbird or even the gmail app on Android,
so that it uses mail.hypno.cat both for incoming and outgoing mails.
Teaching Dovecot to train Rspamd #
You read until here, good.
So this is a bonus section, one that’s absolutely not mandatory in setting up your mail server, but one that I’d like to add because it lets users train the spam filtering the same way they’re used to already: moving a mail to spam, marking a mail as spam or reporting a mail as spam, whichever it is called on their interface. The good news is that it integrates with IMAP, so no matter if they use their smartphone app, a client on their desktop or a webmail, the action of reporting a spam will automatically train the filter.
How you do that is relatively simple in theory, it consists of plugging a couple scripts, one to handle moving a mail from Inbox to Spam and one to handle moving mail from Spam to elsewhere. In pratice, Big Mailer Corps filters also detect that you delete a mail without opening it and such, but let’s not get too excited and start with something that’s already good enough. How you do that in practice is a bit more complex, and that is because we will rely on Sieve which is… how do you put it with diplomacy … “overengineered”.
Given that this is not a critical piece of the setup, you are allowed to shut your brain off and follow blindly instructions. Worst than can happen at this point is that it will not train anything.
To enable imap sieve, the Pigeonhole package must be installed, and as has been the case throughout this article all I need is a simple command:
mail# pkg_add dovecot-pigeonhole
dovecot-pigeonhole-0.5.7.2v1: ok

[...]
And… here comes the tricky part, you need to configure Dovecot to enable imap_sieve, and teach it what sieve scripts to use for what actions.
First, I will need to enable imap_sieve in Dovecot by adding it to the mail plugins for IMAP.
This is done by tweaking the mail_plugins configuration key in /etc/dovecot/conf.d/20-imap.conf:
protocol imap {
    [...]

    mail_plugins = $mail_plugins imap_sieve

    [...]
}
Then to teach Dovecot how to train,
I’ll add the following bit to /etc/dovecot/conf.d/90-plugin.conf,
telling it that there are sieve scripts to trigger when mail gets moved in and out of Junk mailbox:
plugin {
  sieve_plugins = sieve_imapsieve sieve_extprograms
  sieve_global_extensions = +vnd.dovecot.pipe +vnd.dovecot.environment

  imapsieve_mailbox1_name = Junk
  imapsieve_mailbox1_causes = COPY APPEND
  imapsieve_mailbox1_before = file:/usr/local/lib/dovecot/sieve/report-spam.sieve

  imapsieve_mailbox2_name = *
  imapsieve_mailbox2_from = Junk
  imapsieve_mailbox2_causes = COPY
  imapsieve_mailbox2_before = file:/usr/local/lib/dovecot/sieve/report-ham.sieve

  imapsieve_mailbox3_name = Inbox
  imapsieve_mailbox3_causes = APPEND
  imapsieve_mailbox3_before = file:/usr/local/lib/dovecot/sieve/report-ham.sieve

  sieve_pipe_bin_dir = /usr/local/lib/dovecot/sieve
}
Now that dovecot is ready,
I’ll have to prepare the sieve part which relies on two sieve scripts to train spam and ham inside /usr/local/lib/dovecot/sieve:
# cat report-ham.sieve

require ["vnd.dovecot.pipe", "copy", "imapsieve", "environment", "variables"];

if environment :matches "imap.mailbox" "*" {
  set "mailbox" "${1}";
}

if string "${mailbox}" "Trash" {
  stop;
}

if environment :matches "imap.user" "*" {
  set "username" "${1}";
}

pipe :copy "sa-learn-ham.sh" [ "${username}" ];
# cat report-spam.sieve

require ["vnd.dovecot.pipe", "copy", "imapsieve", "environment", "variables"];

if environment :matches "imap.user" "*" {
  set "username" "${1}";
}

pipe :copy "sa-learn-spam.sh" [ "${username}" ];
Because both sieve scripts rely on shell scripts sa-learn-ham.sh and sa-learn-spam.sh,
I also need to create these shell scripts in /usr/local/lib/dovecot/sieve:
# cat sa-learn-ham.sh

#!/bin/sh
exec /usr/local/bin/rspamc -d "${1}" learn_ham
# cat sa-learn-spam.sh

#!/bin/sh
exec /usr/local/bin/rspamc -d "${1}" learn_spam
And finally, I need to compile the sieve scripts and make the shell scripts executable so that Dovecot can actually use them:
# sievec report-ham.sieve
# sievec report-spam.sieve
# chmod 755 sa-learn-ham.sh
# chmod 755 sa-learn-spam.sh
That’s all,
now moving mails from a folder to another I can see the following lines in the /var/log/rspamd/rspamd.log file:
2019-09-13 23:59:46 #18598(controller) <1d44bd>; csession; rspamd_controller_learn_fin_task: <127.0.0.1> learned message as ham: CAHPtQbOxQxBCsVd7nUCP4podu74Pa-F6k28z+4BWfNeeqWYiAg@mail.gmail.com
[...]
2019-09-14 00:01:57 #18598(controller) <b76e28>; csession; rspamd_controller_learn_fin_task: <127.0.0.1> learned message as spam: CAHPtQbOxQxBCsVd7nUCP4podu74Pa-F6k28z+4BWfNeeqWYiAg@mail.gmail.com
[...]
I’m sure these can be simplified, I’ll be honest and say that I don’t really care because it’s just a side-feature, I’m unlikely to touch the sieve scripts for the next decade, I don’t think anyone should touch sieve scripts, we should just come with something better that doesn’t remind me of m4 wankery.
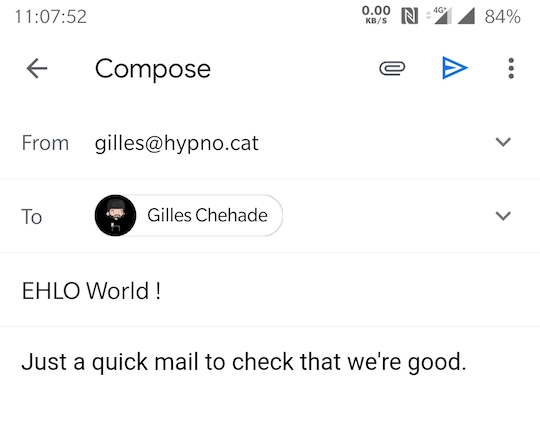
Testing it all #
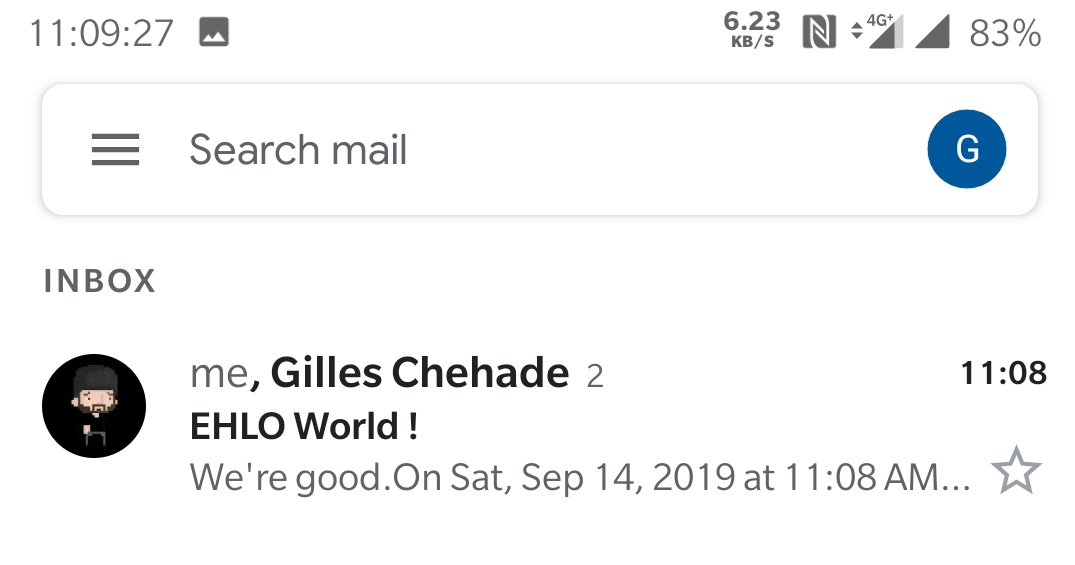
And now, we’ll just test that we can do a round-trip from hypno.cat to gmail.com.
First,
I’ll craft a mail from my hypno.cat account to my gmail.com account:
After sending it,
I’ll check it arrives at gmail.com:

Then, I’ll check that it was sent over a TLS-secured channel:
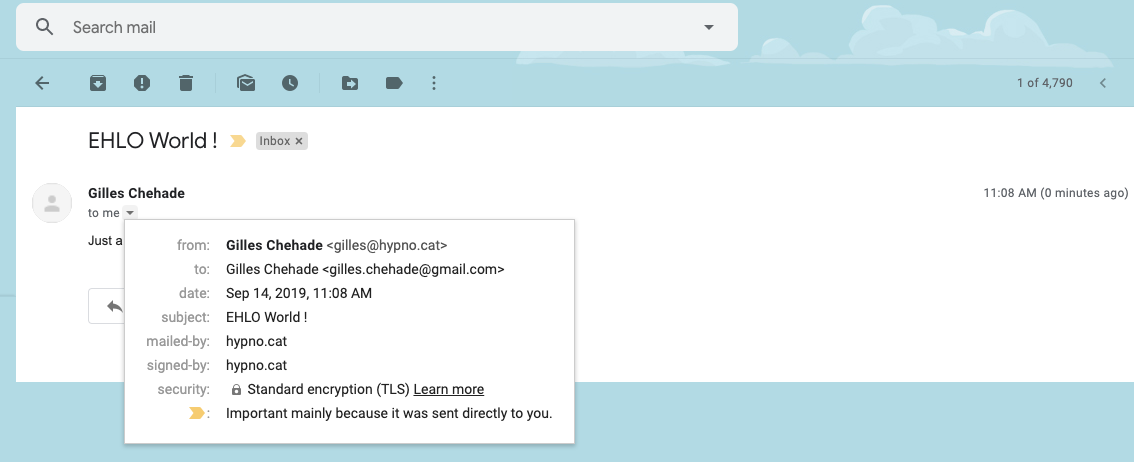
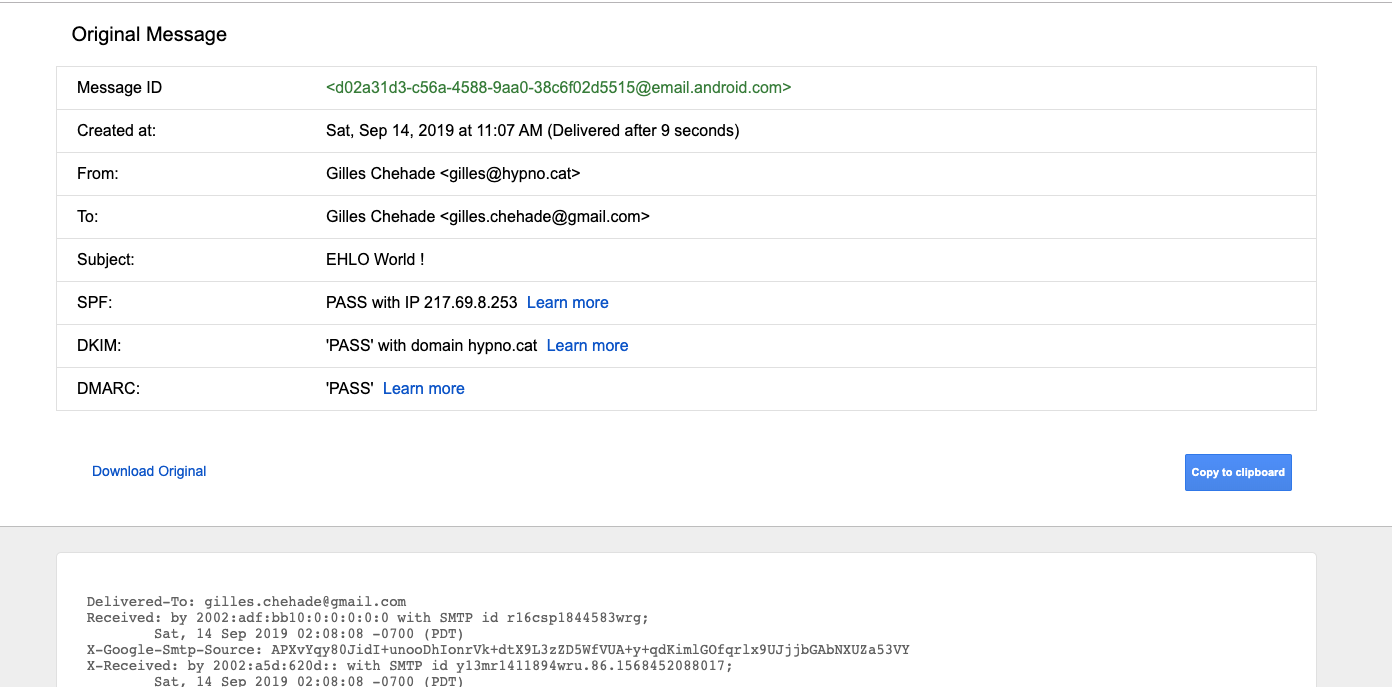
I’ll check that gmail.com is happy with our SPF declaration,
our DKIM signature and that it saw we had a DMARC record.
You do that by selecting “Show original” in the menu associated to each mail:
And finally, I’ll reply to the mail just to be sure that it works both ways:
Yay, we’re done #
So this article is dense, I wanted to explain why we do things, if you remove all my blabber and focus on the purely technical aspects you’ll realize that we built a working mail infra, providing TLS inbound and outbound services, with DKIM, SPF and DMARC compliant outgoing traffic, and spam-filtered incoming traffic. And we did this by:
- adding a couple A records, an MX record and three TXT records to our DNS zone
- making sure rDNS was properly set
- installing TLS certificates
- building a ~15 lines configuration file for an SMTP server
- modifying 3 lines in the default configuration of an IMAP server
- modifying 8 lines in the default configuration of an antispam solution
And because we were in a very good mood and willing to take an extra step to help users train antispam, we implemented ham and spam training of Rspamd by:
- modifying approximately 20 lines in the default configuration of an IMAP server
- copying 4 sieve scripts in a directory
Agreed, it may take a new comer some efforts to come up with these without help, but none of these tasks qualify as hard or tricky. In addition, pretty much all of them are only one-time operations, you don’t edit the DNS zone or reset your rDNS every two days, just like you don’t touch your working configuration once in place unless you have a new use-case. It may happen that you have to do a maintenance, whatever that means, but I don’t see a scenario where such a maintenance would imply having to do “all” of that again.
That being said, after you do it a few times, it takes about ten minutes to replicate this setup from scratch as you’ll know what you’re doing, because… you know, mail is not hard.
So what should you do next ? #
What you should do next is setup redundancy to ensure that a failure of your mail server does not causes mail loss.
In practice, most mail exchangers will retry if their destination is down, so even if you endure a downtime, most of your mails will be buffered by your sender and resumed when your server is back.
In theory, you still want to do things right, and letting others buffer your own messages to cope with your downtimes is fairly impolite as they bear responsibility of your messages far longer than they should… You should investigate how to setup a backup mail exchanger, arrange with friends you trust to backup each other, or even subscribe to a service that will offer backup mail to you. Anything as long as you know a secondary server will be able to cover for you if you have a downtime.
Then, no matter which way you chose to do it, it will boil down to:
- adding an additional MX record to the DNS zone
- configuring a backup mail server so it forwards mail for your domains to your mail server
Rocket, science.
Are we done ? #
I will write a serie of articles to discuss reputation, as well as some of the mechanisms in place at Big Mailer Corps that can cause people to fail delivery.
If these topics are of interest and I get positive feedback, I might just write more often about deliverability concepts, otherwise I’ll just resume what I was doing before: writing about my monthly opensource contributions. It’s up to you :-)
Finally, in this article I have described a very simple setup but there are tons of interesting stuff you can do with mail infrastructures if you’re not scared of working a bit on it.
I’m currently building an infrastructure for a future mail hosting service which spans over multiple data centers in multiple countries, which has a very high tolerance to failures, has backup mail servers to cope with very extreme failures of primary mail servers, can very easily scale to bursts of volumes, that decorrelates incoming and outgoing traffic so it can provide partial services to people, that can easily reroute traffic across machines to work around failures, while providing IMAP services to virtual accounts on a multitude of domains, all with daily backups of all mail directories. The infrastructure currently costs me… less than 75 EUR a month. It is also fairly simple with most machines being default installs of OpenBSD with very few changes to the base system.
If reading about how you can build such setups is of any interest, I could also write about it to help people build MORE hosting alternatives which is ultimately what I hope for.
Thanks for reading me, I still don’t have a soundcloud, however I still have a patreon if you want to support me, or use the widgets right below the comment link to share this article on social medias.
If you find errors in this article, please let me know so I can fix them, I started writing this article late and continued half-way through the night so I might have let errors slip in despite multiple readings.